
In the world of contemporary design and fabrication, materials such as acrylic and plexiglass have undergone a transformation in their application processes through the integration of laser cutting technology. For an advanced expert polishing their skills or a beginner wishing to harness the capabilities of laser-cutting technology, this guide will be of immense help. From material and laser selection to achieving immaculate cuts and high-quality surfaces, we will discuss everything. After going through this guide, you are bound to feel motivated to undertake various innovative projects as you will be equipped with actionable strategies, tools—and best of all—professional advice at every stage. With this guide, I expect your abilities to make laser-cut designs in acrylic and plexiglass to soar beyond previously set limits.
What is Acrylic and Why Use it for Laser Cutting Projects?

Acrylic is renowned for being a lightweight, durable material that is laser cut easily and comes in various colors. The smooth surface and clarity that it offers as a final product make it easy to work with. Additionally, acrylic is preferred due to the precision and polish it offers on the edges after being laser cut. Because of the low cost, strong structure, and great durability, it can be bought for both creative and pragmatic functions.
Different Types of Acrylic: Cast vs Extruded
The methods of making cast and extruded acrylics are different along with their properties. Cast acrylic does cost more, but it does provide greater durability and a lacks control of cracking. It is better for applications that need temperature control and precision. On the other hand, extruded acrylic is less durable and has less resistance to cracking. It does provide uniform thickness making it ideal for projects where lower cost is a main concern. Even though both types share amazing versatility and clarity, the selection of these types completely depends on the requirements of the users.
Benefits of Using Acrylic for Laser Cutting
Acrylic materials can be easily adapted into almost any shape, making them one of the most popularly used materials for laser cutting. Their edges are smooth, which means that there is no need for additional work. Current trends show that acrylic is extensively used for signage, as well as in interior designing and for prototyping, mainly because of their precise cuts and intricate designs which work with minimal material wastage.
Acrylics are estimated to be cut at 500mm/s in speed with correct settings. For commonly used thicknesses of 3mm to 6mm, a CO2 laser with 50-100 watts of power provides clean, precise cuts. Most lasers used to cut acrylics thermally CO2 lasers due to their accuracy and precision. Te research says that cast acrylics gives much better quality edges than extruded ones due to less melting while cutting which results in polish edges that are good for detail work.
Apart from these, acrylics are used for display cases and even protective barriers due to the transparent and durable nature. Businesses and hobbyists can utilize the higher precision, affordability, and versatility of laser cut acrylics to realize intricate design ideas.
Typical Acrylic Projects You Can Do
- Signage – For professional looking signage, acrylic can be cut into precise custom shapes and is transparent which creates a professional look.
- Decor Decorative Items – Wall art and ornaments are just two examples of more intricate designs made with laser cut acrylic.
- Storage Solutions – Clear acrylic can also be used to create durable storage solutions such as jewelry boxes, display cases and craft organizer.
- Custom Keychains – Keychains are popular gift and promotional items. They can be quickly and easily made using custom shaped acrylic.
- Event Decorations – Events are enhanced with the use of acrylic for sophisticated table numbers, centerpieces, and cake toppers.
Choosing the Right Laser Cutting Machine for Acrylic
- Laser Power – Check if the machine is powerful enough for cutting different thicknesses of acrylic. For most applications, a laser with 40 W to 150 W is recommended, lazerengritdepending on the material’s density and how accurate cutting is intended to be on.
- Bed Size – Choose a machine with a bed size that accommodates the dimensions of your acrylic sheets to reduce material pre-cutting.
- Precision and Speed – Look for machines that offer high cutting precision coupled with high efficiency in order to enhance the outcome and save time overall.
- Compatibility – Make sure the machine integrates well with standard design software and supported file formats to ensure seamless integration with your workflow.
- Reliability and Support – Go with a reputable brand that offers technical assistance, training, and easy access to spare parts for arms that need replacing.
Laser Cutters for Acrylic CO2 Laser Cutters
- CO2 Laser Cutters – With the ability to cut and engrave most kinds of acrylic with precision and smooth edges, they are ideal for sign making, decorating, and building prototypes. CO2 laser cutters are probably the most common and versatile.
- Fiber Laser Cutters – They are mostly used for metals, but some high-performance models can process certain types of acrylic. They are not as popular as CO2 lasers for this application.
- Desktop Laser Cutters – This type of cutter is designed for small projects or personal use. It is affordable for beginners wishing to experiment with acrylic materials.
Understanding Laser Power and Cutting Speed Interdependencies
When using laser cutters for acrylic, the ratio of laser power to speed requires equilibrium to achieve precision cuts. Greater laser power, expressed in watts, translates to more efficient cutting of thicker materials. A CO2 laser of 60 watts will generally only encounter an acrylic sheet of 10mm thick while an 80 watt laser will go up to 20mm thick. On the other hand, cutting speed, measured in mm/s, also has an effect on smoothness of the cuts. Faster cutting speeds generally increases the chances of the cut being rough, increasing the likely chance of poor edges.
Some recent research seems to indicate that for a clear 10mm thick acrylic sheet, the best parameters of a CO2 laser cutter would be 75% power and 10 mm/s speed. Less power, 20 to 30 percent with a speed of 300 mm/s, typically yields better results for engraving and intricate work, avoiding overheating issues while delivering greater detail.Also, the specific laser cutter and software used are important in determining these parameters. Some contemporary systems include additional features like power modulation and focus adjustment, which improve the cut quality and flexibility.
Comparing CO2 Laser and Diode Laser for Acrylic
CO2 lasers are generally more powerful and efficient for cutting and engraving acrylic, while diode lasers are less powerful, better for engraving, and less suited for cutting thicker materials.
| Key Point | CO2 Laser | Diode Laser |
|---|---|---|
| Power | High | Low |
| Cutting Depth | Thick | Thin |
| Efficiency | High | Moderate |
| Engraving Detail | Moderate | High |
| Speed | Fast | Slower |
| Cost | Higher | Lower |
| Maintenance | Moderate | Low |
| Material Suit. | Wide | Limited |
| Lifespan | Long | Shorter |
| Precision | High | Moderate |
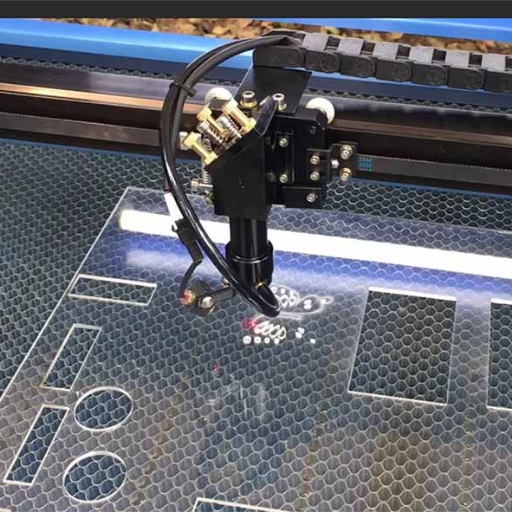
The Process of Laser Cutting Acrylic
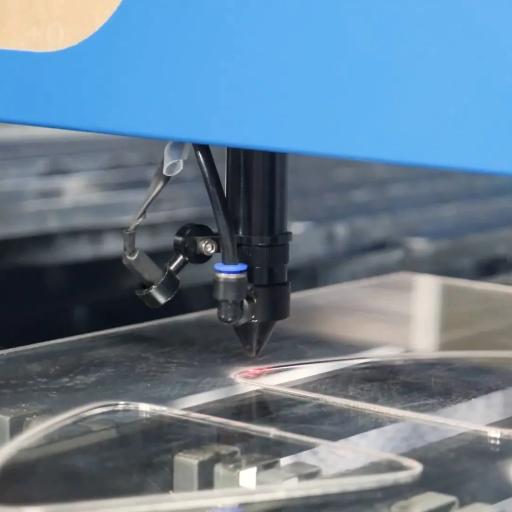
In the context of laser cutting acrylic, a high-powered laser is used to cut or engrave the material precisely. The process starts with a specific software that allows designing the cut or engraving, which is then transferred to an acrylic sheet. After fitting on the sheet, the design gets loaded onto a machine’s cutting bed where the laser executes the steps as per the program. With each step, precise heating is used to melt and evaporate the acrylic instead of burning it, thereby leaving polished surfaces with no residue. Accuracy is critical when determining settings for power, speed, and focus as these directly affect results and chances of damaging the material.
Getting the Acrylic Sheet Ready for Cutting
This section focuses on how careful preparation of the acrylic sheet can streamline the cutting process while maintaining the quality of the results. Always remember that selecting a type and thickness of acrylic is key for the project’s success. For example, Cast acrylic is preferred over extruded acrylic where more intricate designs are to be engraved due to better edge quality. Check the acrylic sheet is free from dust, grease, or any form of contamination as does these work against tuned devices like lasers. Spraying the surface with a mild soap solution, letting it dry as well as wiping using a microfiber cloth are good methods to clean the sheet.
To begin with, ensure that the acrylic is secured to the cutting bed. You can use clamps, weights, or adhesive mats to hold it in place. Make sure that the sheet is flat and free from any warps as this increases the chances of achieving precision during the cutting process. Most laser cutting machines are equipped with honeycomb worktables which optimize airflow around the acrylic and prevent heat accumulation.
It is also important to know the thickness of the material and how it affects the laser settings. For example, a 3mm acrylic sheet would need a power setting of 30-40 watts at a speed of 15-20mm/s. A 6mm sheet would require higher power and slower speeds. These parameters can be modified after performing a test cut on a scrap piece of acrylic to achieve desired results.
How to Set Up a Laser Cutter
Proper setup of a laser cutting machine starts with checking if the piece is fixed on the bed and aligned with the guide. I would as well check that the correct power and speed ratio is set for the material’s thickness. For instance, 30-40 watts at 15-20mm/s for 3mm acrylic would work well. Lastly, I would perform a test cut on a less valuable piece to adjust the settings before proceeding with the full job.
Adjusting Problems Associated with Acrylic Cutting
- The edges of the burnt marks: Ensure the focus of the laser is set properly. It might as well be good to clean the mirror and lens. In case none of this helps, increasing laser power or reducing the cutting speed might help fix the problem. Also, the material should be dirt free when cutting.
- In case the cuts are incomplete, maximum speed should be maintained as well to ensure the laser does not lose focus.
- Melting: Make sure to provide adequate ventilation during this process so the airflow can carry the heat away efficiently. Also, focus on the lower levels of power to prevent excessive heat build up.
- Chipping: Double check that the used laser setting does not exceed the capability of the acrylic, some grades don’t like laser treatment.
- Fogging or Residue Build Up: To maintain cutting accuracy, the laser’s optics, including mirrors and lenses, should be cleaned on a routine basis.
How to Engrave and Cut Designs on Plexiglass?

Starting with the right power settings for your laser cutter, plexiglass engraving and cutting can now begin. During engraving, use only low to medium power to avoid excessive heat. When cutting, make sure both the power and speed settings will yield ideal results while ensuring smooth edges. You must also make sure that the plexiglass is clean before working with it. To determine the optimal settings for your machine and material, always test on a scrap piece first. During the process, remove ventilation fumes fumes for your workspace and clean the lens regularly to maintain optimal performance.
Strategies For Laser Engraving Plexiglass
Achieving high-quality results requires you to take into consideration the type of plexiglass you opt for. For laser engraving, cast acrylic is more beneficial than extruded acrylic because it results in finer details and a more frosted appearance. Recent findings and some manufacturers suggest that cast acrylic provides more diffusion microlenses which allows for more clarity and detail in the engraved designs.
To achieve the best results, it is a good practice to keep your laser power between 10 to 30% when engraving, depending on the material’s thickness and kind. Engraving speed settings around 300-500 mm/s are often suggested. When cutting plexiglass, clean cuts with low edge charring are achieved at higher power settings (60%-100%) and slower speeds (10-30 mm/s). In addition, lower range frequencies of 500-1000 Hz can help reduce overheating and warping.
Data also shows that precision focus is critical for laser engraving, as detailing is sharper and cleaner with a focus. Accuracy can be improved with autofocus on newer laser machines, manual focus adjustments, and air-assist systems that blow away debris which can help prevent materials from melting and burning during engraving/cutting. For best results, constant supervision during machine operation is required for safety and quality control.
Optimizing Laser Settings for Best Results
Calibrating the laser settings accurately is the most important factor in achieving the best results with laser engraving. As always, start with adjustments to the power and speed settings relative to the material used. Lighter engravings require lower power with higher speeds while deeper cuts require higher power set to slower speeds. These steps can also be implemented with test runs on scrap material to adjust these parameters further. As always, adjust the resolution settings based on the required detail. Resolution provide finer details but take more time to process. At last, check the focus accuracy and trimming precision. An air-assist can greatly aid in keeping the cutting area clear from smoke and debris.
Creating Intricate Designs with Laser Cut Acrylic
When creating intricate designs with laser cut acrylic, the most important factor is choosing a proper grade of acrylic. Acrylics are categorized into sheets; Cast or Extruded. Cast acrylics are favored when laser cutting because they possess clarity, are hard and provide polished and detailed edges. Recent studies have reported that Cast Acrylics have a melting point of 160 degrees Celsius or 320 Fahrenheit which is optimal for laser cutting machines.
For cutting 3 mm cast acrylic, laser settings should start from a power cutting level at 60% to 80% and speed at 10% to 15%. For engraving, a power setting of 20% to 30% will give better results at speeds of 300 to 500 mm/s. It is worth noting that these values may differ from laser to laser, so doing test cuts is always important.
To finalize designs, users can utilize modern software such as Adobe Illustrator and CorelDRAW. These programs can be used to create and modify geometric shapes and even more advanced curves and designs. As highlighted from studies done, the use of vector graphic design files .AI .DXF and .SVG enhances precision and reliability with the laser systems.
Additional safety features such as air-assist and ventilation systems reduce flame and scorch marking extremities. When used while cutting plastics like acrylic that give off fumes, it ensures a safer working environment. Paying attention to these technical details will achieve a professional grade outcome when acrylic designs are laser cut.
Maintaining Your Acrylic Laser Cutter

- Clean the Lens and Mirrors Every So Often: Over time, the machine’s performance may degrade because of dust and debris buildup on the lens and mirrors. To avoid abrasion, use the proper cleaning tools.
- Check Air-Assist Nozzle: Make sure the air-assist nozzle is not blocked for optimal efficiency. If an air-assist nozzle shows signs of damage, replace it.
- Check the Ventilation System: Ensure that there are no malfunctions with the ventilation system responsible for removing cutting fumes.
- Maintain Operational Components: Other components like guide rails should be checked periodically and lubricated to maintain optimal functionality.
- Observe the Cutting Performance: Pay attention to the quality of cutting done by the machine and replace the tube if necessary to maintain efficiency.
Preserving the Life Expectancy of Your Cutting Tools and Machines
For protective measures and practices towards your tools and machines, it is imperative to follow specific schedules for tool and machinery usage along with routine checkups. Performing cleaning tasks like lubrication of parts, and other scheduled checks must be performed as advised by your operator. Furthermore, placing boxes and tools in arid areas protects moisture, breeding of dust, and rust. Along with these measures, frequent revision courses and classes are also very important to equip personnel with new safety skills and proper protocols concerning machine operations. The cornerstone of prolonging downtimes while keeping performance metrics in check rests on following established routines.
Responsibilities for Safety and Health when Operating Laser Cut Machine
Over the years it has been witnessed that there are many workplace injuries due to negligence on the safety practices when using a cutting laser. Neglecting the safety measures associated with using is reported yearly making it a concerning habitual occurrence. With all other precautions as PPE, they should include goggle lenses with the appropriate density for the laser being used and particles emitted while cutting. Properly ventilated areas or workplaces devoid of fume exhaust build-up should also be ensured as a standard safety measure.
As noted in an industrial safety report from 2023, more than 30% of accidents involving lasers and cutters happen because of an operator’s negligence or insufficient training. This emphasizes the need for in-depth training and proper briefing on the machine’s handling, safety protocols, and emergency maneuvers for all users. Moreover, as with all machines, routine checks for worn and damaged parts that might pose malfunctioning or hazardous risks should be conducted. By integrating these measures based on the most current regulations and recommendations, the dangers presented by laser cutting can be drastically minimized.
Reference sources
- “Effect of CO2 laser cutting parameters on dimensional accuracy and heat affected zone on acrylic” (Palanisamy & Aieman, 2024) by Chockalingam Palanisamy and Muhammad Shahrill Aieman (2024): This paper investigates the impact of CO2 laser cutting parameters (likely including power, speed, and possibly focal length) on the dimensional accuracy and heat-affected zone of the cut acrylic. The methodology involves varying these parameters systematically and measuring the resulting accuracy and heat damage. The key findings would be the optimal parameter settings to minimize errors and heat damage.
- “Parametric and heat affected zone study on CO2 laser cutting of acrylic” (Palanisamy et al., 2023) by Chockalingam Palanisamy et al. (2023): Similar to the previous study, this research explores the relationship between laser cutting parameters and the resulting quality of the cut, focusing on the heat-affected zone. The methodology is likely experimental, varying parameters and analyzing the results. Key findings would detail the influence of each parameter on the heat-affected zone.
- “OPTIMIZATION OF LASER CUTTING ENGRAVING PERFORMANCE WITH ACRYLIC MATERIAL USING THE TAGUCHI METHOD APPROACH” (Buwono et al., 2022) by Bagas Jaya Buwono et al. (2022): This study uses the Taguchi method, a statistical experimental design technique, to optimize laser cutting parameters for acrylic, aiming to minimize surface roughness. The parameters varied likely include laser power, speed, distance, and potentially cooling time. The key finding is the optimal combination of parameters for achieving the desired surface finish.
Frequently Asked Questions (FAQs)
Q: What brand of laser cutter is best suited for beginners and can cut acrylic?
A: As regards ease of use and functionality, the best laser cutter that also cuts acrylic for beginners would be one with a friendly interface and options for different thicknesses of acrylic.
Q: What type of acrylic is better for laser cutting between extruded and cast; why?
A: Cast acrylic comes out as the better alternative for laser cutting and engraving because of the edges better quality and clarity than extruded acrylic. Extruded acrylic is able to cut clear acrylic sheets but tends to leave more burrs compared to cast acrylic resulting to a duller polish.
Q: What is the maximum thickness of acrylic materials that a laser can effectively cut?
A: The maximum thickness for each machine ranges differently. Generally, a basic acrylic laser cutting machine will have no issues with cutting acrylic to a thickness of half an inch, but additional power will be required if the desired thickness of acrylic is greater than this.
Q: What factors should be looked into while cutting acrylic with a laser?
A: While laser cutting acrylic, take into account the cutting speed, power of the laser, and the type of acrylic (cast or extruded). Focusing on these parameters will provide the best outcomes.
Q: Is it possible to use a diode laser cutter for an acrylic sheet?
A: Acrylic sheets can be cut using diode laser cutters, however, they may be best suited with CO2 lasers for thicker materials or intricate designs due to lower power.
Q: What is the difference between fiber laser and CO2 laser while efventifying acrylic cutting?
A: For acrylic projects, CO2 lasers are more efficient as they are better suited for non-metal materials like acrylic and plexiglass. Fiber lasers are typically used for metals and may not be the best choice for acrylic.
Q: What technique can be applied to achieve smooth finishing while laser cutting and engraving on acrylic?
A: Achieving a smooth finish when laser engraving and cutting acrylic requires appropriate settings for the laser’s power and speed, meticulous attention to the work area’s cleanliness, as well as proper focusing of the laser beam on the acrylic surface.
