
For many DIY enthusiasts or carpenters, the precision of each measurement and step matters greatly. When it comes to cutting and fitting parts, you will come across the terms ‘bevel cuts’ and ‘miter cuts.’ Although they may seem synonymous, these techniques are quite different from each other in application, technique, and method. Knowing these differences will help in executing your projects cleanly and professionally. In this article, we will discuss the differences of bevel and miter cuts, describe how they are used, and offer helpful tips to master the two techniques. This breakdown is designed for both advanced artisans and intrigued novices looking to confidently develop their skills and achieve their goals.
What is a Bevel Cut and How is it Used?

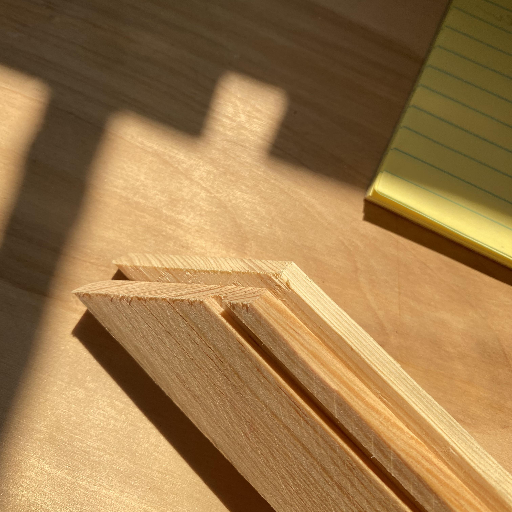
A bevel cut is an angled cut along the edge or end of a piece of material, bisecting it at a non-right angle (neither perpendicular nor parallel) to the face of the piece. It is used in woodworking, construction and engineering when pieces need to be joined at an angle, for improving aesthetics or for creating designed features. Bevel cuts are widely used in the making of picture frames, trim works and decorative edges.
Defining the Bevel Cut
Indeed, a bevel cut can be described as an angular alteration made to the edge or end of a material which is intentionally done at an angle (other than 90 degrees) to the surface. Unlike approaching cuts that are perpendicular to the piece, bevel cuts introduce slanting style which adds both function and decor. They are very helpful in achieving accurate joins between parts, most especially in fastening of mortise and tenon whose angles may be acute or obtuse. Such a cut enhances the fit of materials structurally and aesthetically important in intricate design works that most people are fonds on.
Uses of Bevel Cuts in Woodworking
In my line of work, bevel cuts are critical for achieving smooth and accurate joints in the assembly of elements at angles, such as in picture frames, crown moldings, or the edges of furniture. They help me fasten angled parts in place in a strong and visually appealing manner. Bevels also help embellish shapes that are cut into the objects for creation and are vitally important in making the piece’s workmanship distinct and better.
How to Make a Bevel Cut Using a Miter Saw
To cut wood using a miter saw, one has to set the working place properly and perform a number of steps. The first step involves getting the set-bevel inch angle of the saw as it is intended to be. This can be adjusted and actionable with the bevel angle knob or leverage. The bulk of a certain size wood also referred to as a workpiece, is gotten in most miter saws unless it exceeds 45 degrees for a stand common woodworking joints-like umber, trim, or breastwork. The workpiece should be firmly held upon the fence so no movement occurs during the cut. The cuts on the saw blade should be marked up for alignment so powering on the saw should rotate the blade smoothly along the cut line, this should be done slowly drop the blade settled when cutting wood so that it is clean. Always prioritize protecting oneself by putting on barads, removes from blades, and using socks in avoiding places around the blades.
Based on recent developments and user feedback, contemporary miter saws are now fitted with laser guides and digital angle displays to enhance precision and efficiency. Statistics show that the use of laser cutting alignment aids improves the accuracy of cuts by as much as 25%. Moreover, tools fitted with digital displays of angle position eliminate guesswork in the setting of angles, thereby demonstrating the angle set. For hardwoods or complicated bevels, fully polished blades with a minimum of 80 teeth improve smooth surfaces while reducing splintering, further enhancing the professionalism of the product.
Exploring the Miter Cut: Techniques and Uses

A miter cut is an angled cut across the face of a piece of material, most often at a 45 degree angle in order to get a smooth joint between two pieces. Such a technique is used while making picture frames, picture frame molding, trim work and other similar tasks that require clean and seamless edges. In this case, it is advisable to use a miter saw with a miter angle scale for better results.
Explaining the Miter Cut
A miter cut works best for projects where two materials need to be joined together at an angle and the joint needs to be smooth. Miter joints are very useful for making strong joints in corners or frames as opposed to using a simple straight cut. Accuracy is achievable by using a miter saw with a well set miter angle which ensures clean, repeatable cuts leaving the end result polished and professional.
Common Uses of miter cuts in carpentry
Miter cuts are a common feature of numerous carpentry and woodworking projects owing to their neat and accurate joints and clean joints. One notable application is within the construction of picture frames, which require more precision due to the angled pieces that make sharp corners. Miter cuts are also very prominent in the circles of crown moulding and baseboards where they capture the smooth flow of corners and polished professionalism of the work.
Also, other pieces of furniture will use them for decorative trim on edges of tables, where the angle will be used to make elegant joints. The versatility and importance of good miter cuts cannot be overstated in carpentry.
Steps to Make a Miter Cut with a Mitre Saw
- Cutting: Do not cut until you are satisfied with the length of a measuring tape and have both the object and drawing tools at hand- some traditional pencil or market should do the trick. Not until the marker accompanies the actuated pencil should the cutting start.
- Adjust The Saw Angles: For various other purposes around the mitered saw’s juncture set the angle of other parts of the contraption to your preferred saw angle. The sanding block is the adjustable gauge where every miter saw has unlimited freedom along the 0°45° sash that most found their realm.
- Hold the Material: Make sure the material is held in position against the miter saw fence. Prevent sliding for the duration of the cut using clamps if it’s absolutely required.
- Set the Blade: Move the saw to the prescribed position, check the blade (off) so it won’t be turned on while lowering the blade on sliced part. If everything set, check once again.
- Do the Cut: Cut through by turning on the miter saw and lowering the blade into the material slowly. Give gradual pressure to the movement to increase the accuracy.
- Check the Cut: After the cutting is done check all edges to see that they are right and smooth. Change the setup and approach if you think something is wrong in these adjustments for the next cuts.
Bevel vs Miter Cuts: Key Differences and Similarities

An angled miter cut is an intricate cut across the width of an object. It is useful in joining two pieces at an angle which is prevalent in picture frames and the corners of moldings. A bevel cut refers to an angle cut along the thickness of an object and favors the side of edges and other decorative aspects. The primary difference is how the angle is cut. Miter cuts are across the surface whereas bevel cuts are along the edge. Both enhance beauty and precision in woodworking tasks.
Difference Between a Miter Cut And a Bevel Cut
The difference between a miter cut and a bevel cut fundamentally lies in the angled cut’s alignment with the worked surface. A miter cut applies to an angled cut across the width or face of a material and is used to join two surfaces together at a right corner. It is a standard cut used in picture frames, trim, and molding. A bevel cut, on the other hand, cuts at an angle along the thickness or edge of the material. Bevel cuts are mostly decorative but can serve functional purposes as well. Knowing where each miter and bevel is used allows for accuracy and finesse in woodworking work.
When to Use a Bevel or Miter Cut
Your project’s needs will determine when to use a bevel or miter cut. Miter cuts are preferred for sharp corner joints as they are easier to execute on picture frames, window casings, and crown moldings. Anytime two pieces of a material need to be joined at an angle, miter cuts do the job best.
Bevel cuts are more decorative and visually striking, mostly used to soften edges or appeal angles to a surface. They are ideal for cabinetry and furniture which require beveled edges. By assessing the goals as well as the functional requirements, scope, and design of the woodworking project, it will be easier to choose between miter or bevel cuts.
Advanced Cutting Techniques: Compound Miter Cuts
Utilization of compound miter cuts occurs where both a miter and a bevel angle need to be addressed at once. These cuts are often used in the more referred to crown molding and intricate trim projects where tight-fitting angles are required. A compound miter requires both the miter and bevel angles to be set on the saw. Make sure that measuring is done accurately as well as setup so that results are clean and precise.
What is a Compound Miter Cut?
Compound miter cuts are more advanced than standard miter cuts because they amalgamate both a miter and a bevel angle. The miter angle denotes the horizontal crosscut of the material’s width and the bevel angle an angled cut along the material’s thickness. This type of compound is critical for assuring accurate cuts in joints of corners especially in crown moldings, picture frames, and other trims. Both the miter and bevel parts of the saw are adjustable to facilitate compound miter cuts enabling components to join at non 90° angles which makes it an efficient method for construction and decoration at the same time.
Steps on How to Do Compound Miter Cuts
Achieving compound miters involves intricate steps and the correct use of tools. The primary equipment needed for this task is a compound miter saw which provides adjustments for miter and bevel angles. Begin by measuring the correct angle required for your work using a protractor and an angle finder. It is also good to note that some compound miter saws feature clear angle measurements which display miter angle( horizontal cut) and bevel angle (angled cut through the thickness).
While you are performing the cuts, make sure to clamp the material securely, as movement might compromise the accuracy of the cut or pose a safety hazard. Additionally, using the correct blade type for the material will ensure smooth edges. For fine wood cuts, it is recommended to use a 60-tooth blade while rough cuts can use a blade with fewer teeth.
Also, saw calibration is critical to prevent expensive errors, which requires a calibration accuracy. To check the saw alignment, perform test cuts with scrap material. Many experts suggest that saws should be calibrated at least once every month but for heavy users, it should be calibrated more often. Research has proven that even slight misalignment of joints, in the range of 0.5 degrees, can affect the fit and appearance of the finished joints in highly-precision work.
Safety is very important as well when making compound miter cuts. Safety glasses and gloves should be worn and working area must be free of unnecessary materials. During operations, hands should never be positioned under the saw blade as it must be a minimum of six inches away from the blade.
Through proper spacing for your cuts, calibrating tools, and upholding a safe workspace, compound miter cuts can be made accurately and skillfully while satisfying visual and structural demands.
Uses of Compound Miter Cuts in Picture Frame Construction
The application of compound miter cuts is a critical consideration to achieve quality picture frames, particularly where detailed patterns and accurate corner joins are required. Sturdy angled and beveled joints are prerequisite for joining four frame pieces simultaneously, and to achieve that, the versatility of compound miter saws is essential. A study conducted on intricate woodworking indicated that a 45-degree angle is most popular with square or rectangular frames as it yields optimal right-angle corners when framed.
Newer industry studies indicate that the use of digital miter saws with laser pointers enhances precision with regard to accuracy of measurements to within 0.1 degrees. This high degree of accuracy minimizes material waste, which is critically important with the rising cost of oak and maple wood. Also, the use of woodworking jigs and clamps during assembly enhances the frame’s stiffness and stability, especially in wider frames meant to contain large or heavy artworks. When these modern methods are blended with traditional craftsmanship, productivity and quality of frames improves significantly.
Troubleshooting Common Cutting Problems

- Check the Blade: Always inspect the condition of the saw blade and its alignment. An improperly aligned saw blade or one that isn’t sharp will cause uneven edges.
- Securing the Material: The material needs to be clamped to avoid any movement during cutting. Any movement will lead to inaccuracies.
- Measure Twice, Cut Once: Before any cutting, all measurements and marking lines must be verified. Skipping this step may lead to mistakes.
- Inspect the Cutting Surface: Look at the cutting surface which is the workbench or cutting table to make sure it is clean and even.
Fixing Inaccurate Angles in Bevel and Miter Cuts
Check the bevel and miter angle gauges to make sure everything is set correctly. Lastly, confirm that the blade and the desired angle. If any part is off, fix it.
To improve accuracy, check the material and its alignment with the cutting tool. If secured improperly, material can shift during cutting, causing inaccuracies. Secure the material using clamps, ensuring both the workpiece and the saw are stable. Look after the saw blade, keeping it sharp and clean, as a dirty or dull blade will drag and deviate during a cut.
In case the problem continues, try executing some cut tests on scrap pieces first. This is a good way to make last minute adjustments to finalize the angles to make the cuts more precise. Focus on all parts of the process to get sharper and more straightforward bevel and miter cuts.
How to Prevent Workpiece Damage While Cutting
Implementing a few simple protective measures can help keep your workpiece intact during the cutting process. Clamping the workpiece in place using appropriate fixtures or clamps keeps it from moving during the process. Utilizing a sacrificial backing board beneath the workpiece can help minimize tear-out at the base of the cut. For more delicate materials such as plywood or veneered boards, applying tape along the cut line greatly assists in preventing chipping or splintering.
As part of your maintenance duties, check the cutting tools and their parts for damage. Change out dull blades immediately as they are inefficient and more likely to give rough cuts that will damage the workpiece. Always fit saws and routers with blades or bits that suit the material. For example, high tooth count blades are best for softwoods and laminate fine cutting.
Industry tests show that sharper blades yield a 40-60% increase in surface finish quality for most tests done, as opposed to blunt ones. Further, accuracy has been found to increase up to 30% when tools are set to operate at the correct speed. Implementing these measures along with periodic check adjustments will ensure materials are not damaged while high quality cuts are achieved.
How Miter Gauges Ensure Consistent Angle Cuts
A miter gauge helps cut as well as shape work pieces in metalworks and woodworks. Modern miter gauges are updating rapidly. They now include laser angle markings with a precision of 0.1 degrees. Moreover, modern gauges include adjustable stops for angle 45 and 90 cuts which can make production processes smoother.
A well calibrated miter gauge is said to reduce alignment errors by almost 25%, resulting in cleaner cuts. A miter gauge used together with a quality table saw increases the accuracy of cutting angles by a further 30% while the angular precision of hardwood and other heavy duty materials improves even more. Other than regularly calibrating the gauge, it is best to avoid letting time accumulate as small miscalculations can build up over long durations and ruin project goals in latter stages. Adhering to these principles enhances personal craftsmanship ensuring handcrafted projects yield better results every time.
Reference sources
- “Choosing and Using a Miter Saw”:
- Discusses the evolution and types of miter saws, including standard, compound, sliding, and dual compound-miter saws.
- Explains their applications for bevel and miter cuts, particularly in tasks like crown molding and framing.
- Provides practical tips for setup, accuracy, and safety.
- “Crown-Molding Fundamentals”:
- Focuses on the challenges of installing crown molding, requiring precise miter and bevel cuts.
- Highlights techniques like coping inside corners and using compound cuts for scarf joints.
- Offers solutions for irregular walls and ceilings, emphasizing the importance of planning and preparation.
- Sears Radial Arm Saw Manual:
- A technical manual detailing the operation, maintenance, and adjustments of a radial arm saw.
- Includes instructions for performing miter and bevel cuts, along with safety guidelines.
Frequently Asked Questions (FAQs)
Q: What is the difference between bevel and miter cuts?
A: Anything involving woodwork always requires a carpenter to understand the difference between bevel and miter cuts. A miter cut is made across the face of the piece to be cut at an angle, normally 45 degrees, whereas a bevel cut is done by tilting the saw blade, thus creating an angled edge on the side of the wood that needs to be cut.
Q: How do you make bevel cuts using a circular saw?
A: Make certain that the blade is set at the required angle before the first incision is made. Adjust the blade’s height suitably for the bevel cut’s angle to ensure exact alignment. The circular saw’s base should be set properly as well, and as with any sawing, safety should be prioritized when the wood piece is being cut.
Q: What is a compound cut?
A: This unique cut is made when a miter and a bevel cut are both done at the same time, resulting in a compound cut. This is often done using a slider compound miter saw which is very adaptable concerning the angles of the cuts and is ideal for complex wood work pieces.
Q: When should you use a sliding compound miter saw?
A: A sliding compound miter saw is best utilized for executing precision miter and bevel cuts on bigger or longer timber. It performs both cross cuts and compound cuts effortlessly.
Q: How can you ensure saw safety when making miter and bevel cuts?
A: For safe operation of the saw, one must protect himself with the right safety attires, such as goggles and gloves, clean the area, and use well functioning power tools. The work piece should be held properly and the operator’s hands carefully controlled during the cutting actions.
Q: What are the two types of cuts commonly used in woodworking?
A: In woodworking, a miter cut and a bevel cut are the two cuts that are routinely used. Knowing the difference between these cuts assists in appropriating the right cut that one wishes to use on a given project.
Q: What is the purpose of adjusting the miter saw base?
A: Changing the miter saw base gives room to set the miter angle which must be done if the mitered cuts are to be accurate. The adjustment is also important in controlling the angle on the face of the material worked on.
Q: In practical work, how do you distinguish between bevel and miter cuts?
A: Understanding bevel and miter cuts differ through the practice of hand and power tool woodworking, such as with a slider miter saw and hand techniques. This fosters the ability to make the appropriate Choice of cuts for particular woodworking tasks.
Q: What is the difference between bevel and miter cuts?
A: It is common knowledge that angle cuts and precise joints which elevate the quality of the work done, better than uncalculated merges, need proper joint strategies. That is why bevel and miter cuts still stand important for framing, molding, and cabinet work.
Q: What are the advantages of using a sliding miter saw to cut wood?
A: Saw versatility increases significantly with sliding miter saws as higher cross cuts can be achieved together with precise miter and bevel cuts which these cuts require. This greatly broadens the possibilities in fine woodworking.
